Chat Using an X Tool to Configure a PPP Client:
So far, we have configured PPP by editing the configuration files with a text editor. It is also possible to configure a PPP client by using a graphical tool running under X Windows. Every Linux distribution offers at least one tool for this purpose, and a new set of tools is released with every new version of Linux. Red Hat 7.2 alone offers three easily accessible tools to do this one task. Perhaps the most accessible tool is the one that is launched by double-clicking the Dialup Configuration icon located on the GNOME desktop. This starts an installation wizard.
The first time Dialup Configuration runs, it automatically detects the modem attached to the system, if none has been configured. It then moves on to configuring a dial-up connection for the modem, asking for the phone number and then the user name and password. Finally, in a window labeled Other Options appears, in which you are encouraged to select Normal ISP from a drop-down menu. Normal ISP sets the normal defaults used for a PPP connection. These default values can be adjusted later.
Subsequent runs of Dialup Configuration displays a window labeled Internet Connections. This window contains two tabs: Accounts and Modems. Select the Accounts tab to add new dial-up scripts, delete old ones, or edit the dial-up and PPP characteristics of an existing script. Select Modems to add a new modem, delete an existing modem, or edit the characteristics of an existing modem. The figure below shows the Internet Connections window and the Edit Internet Connections window that appears when a current connection in the Internet Connections window is highlighted and the Edit button is clicked.
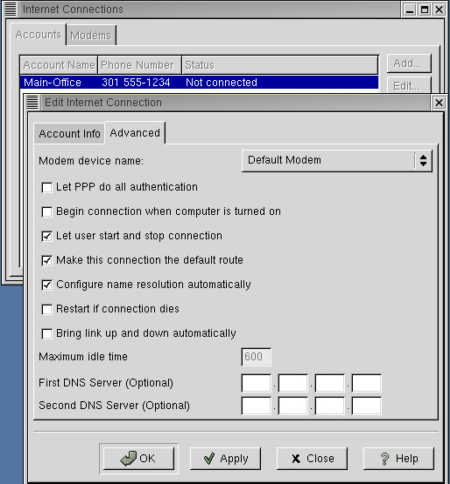
Figure 2.4: The Internet Connections window The Edit Internet Connections window has two tabs. The Account Info tab defines the username, password, and telephone number used to establish the connection. This tab also contains the Account Name field. The Account Name is any arbitrary label that identifies this connection to the user. In the figure, we used the account name Main-Office because this account is used to connect a branch office into the main office.
The second tab is label Advanced. The Advanced tab is used to set various PPP parameters. The following actions set configuration values through this tab:
- Select the modem used for this connection from the drop-down menu.
- Use the Let PPP Do All Authentication check box to set the PPP auth parameter described earlier.
- Use the Make This Connection The Default Route check box to set the PPP defaultroute parameter described earlier.
- Use the Begin Connection When the Computer Is Turned On check box to start the PPP connection at boot time. Use this setting when the client always connects to the same server and when the client should be "always on." This is the setting you would probably use for a branch office connecting into headquarters. Two other settings provide alternative ways to control when the connection is made.
- Use the Let The User Start The Connection check box to permit the user to manually make the connection before using any TCP/IP services that depend on the connection. Use this setting on clients that use multiple servers. To make the connection, the user opens the Internet Connections window, highlights the desired connection, and clicks the Debug (or Dial) button. There is one final way that connections are made.
- Use the Bring Link Up And Down Automatically check box to allow applications to make the connection on demand. When this check box is selected, launching the Mozilla browser causes the client to dial the server. The connection is brought down when it is idle for the amount of time specified in the Maximum Idle Time box.
- The tab offers two techniques for configuring name service. Check the Configure Name Resolution Automatically box if the configuration is provided externally. Enter the IP addresses of two DNS servers in the boxes at the bottom of the tab if the DNS configuration is being provided here.